
5: Greenwich Village Maisonette renovation: Bidding Negotiating & Permitting
With the Construction Documents finalized, our renovation project was ready to step out of the design studio and into the real world of builders, contracts, and permits. This phase is often a multi-threaded process – securing a contractor through bidding and negotiation, while also obtaining all necessary approvals from city agencies and the building’s board. In our case, because the home is in a landmarked building and a condo, the permitting and approval process was especially involved.
Many clients find this stage to feel like a three-ring circus: multiple things happening at once, lots of paperwork, and critical decisions that will set the tone for the actual construction. Our job as the architect is not only to produce the documents, but also to guide the client through these parallel steps – making sure we find the right contractor at the right price and that we’ve cleared all regulatory hurdles so construction can proceed smoothly.
Here’s how we tackled the Bidding, Negotiation, and Permitting phase for the Greenwich Village maisonette renovation:
1. Bidding: Finding the Right Contractor
Preparing the Bid Package: We compiled all the relevant documents into a comprehensive package to send to bidding contractors. This included:
The Construction Drawings and Specifications – essentially the full set we discussed earlier, so that every bidder was pricing off the same information.
A Scope of Work summary: a narrative we wrote in plain English outlining the major tasks (e.g., “Demolish existing kitchen and baths; dispose of debris off-site. Protect existing historic elements as noted. Construct new partitions per plan…” etc.). This helps ensure nothing is missed and highlights things not obvious in drawings (like requirements to coordinate with certain vendors or include certain services).
Bid Forms: We provided a standardized spreadsheet for them to fill in costs. This is crucial for an apples-to-apples comparison. We broke it down by division (demolition, carpentry, finishes, plumbing, electrical, etc.) and asked for labor vs. material breakdowns in some key areas, plus separate line items for things like permit fees, cleanup, and any unit prices (like cost per square foot for additional flooring if needed).
Instructions to Bidders: This was like the rules of the bidding game. It listed the bid due date (we gave about 3-4 weeks, given the complexity of the job), how they should submit (we requested both a hard copy and an email PDF of the bid form and a cover letter), any mandatory site visit dates (we scheduled times for them to walk through the apartment), and who to direct questions to (me, the architect, in this case). We also indicated that the bid must be stiff (firm) for X days (usually 60 days) and that we reserved the right to negotiate or not accept the lowest bid. Essentially, it formalizes the process.
We issued this package to four pre-qualified contracting firms. These firms were ones we or the client knew had good reputations for quality in Manhattan renovations, and importantly, had experience dealing with Landmarks and condos (meaning they know how to keep neighbors happy and file paperwork correctly).

An example of a Bid Levelling Document developed for the another renovation. Shown here are select sheets comparing contractor submissions across key divisions—including project requirements, architectural millwork, drywall and framing, and stone and tile installation. This document helps clarify scope, identify discrepancies, and ensure informed contractor selection for a landmarked property.
Site Walk-Throughs & Q&A
We hosted a walk-through of the project site with each contractor (some came together on one day; others who couldn’t make that day got separate tours – the key was everyone got the chance). During these visits:
We, as architects, walked them through our plans on-site so they could see the physical context – low ceilings here, tight stair there, etc. We pointed out “This cornice will remain, so careful during demo,” and “We’ll need to run ductwork through here, note the clearance.” We also had the building’s super present to answer building-specific questions (like where they could stage a dumpster or how to reserve the elevator).
The contractors took measurements and notes. Some brought their subcontractors for a quick look (e.g., a plumbing sub might come to see how to run a new line). We encouraged that because a more informed bid is a more accurate bid.
After the walkthroughs, contractors typically send RFIs (Requests for Information) – basically formal questions about the documents or conditions. We compiled all questions that came in (for fairness, we anonymize them) and issued a bid addendum to all bidders addressing those questions. For example, one asked, “Is the flooring in the living room to be replaced or refinished?” – even though it was in the spec, we clarified in the Q&A response to all: “Living room pine flooring to be refinished, not replaced, per spec Section…”. Another question: “Any work to be done in common areas (e.g. running new plumbing in basement) and who covers repair?” – we answered that in addendum too (“Yes, see plumbing sheet P-2, and contractor to include patching of any holes in common areas.”). This way, all bidders have the same understanding.
To manage the flow, we set a cutoff for questions (usually about a week before bids were due). In our case, we ended up with a 5-page Q&A document we sent to everyone. The transparency here ensures no bidder has an advantage or disadvantage information-wise.
With the site visits done and Q&As answered, each contractor had a fair shot at preparing a thorough bid.
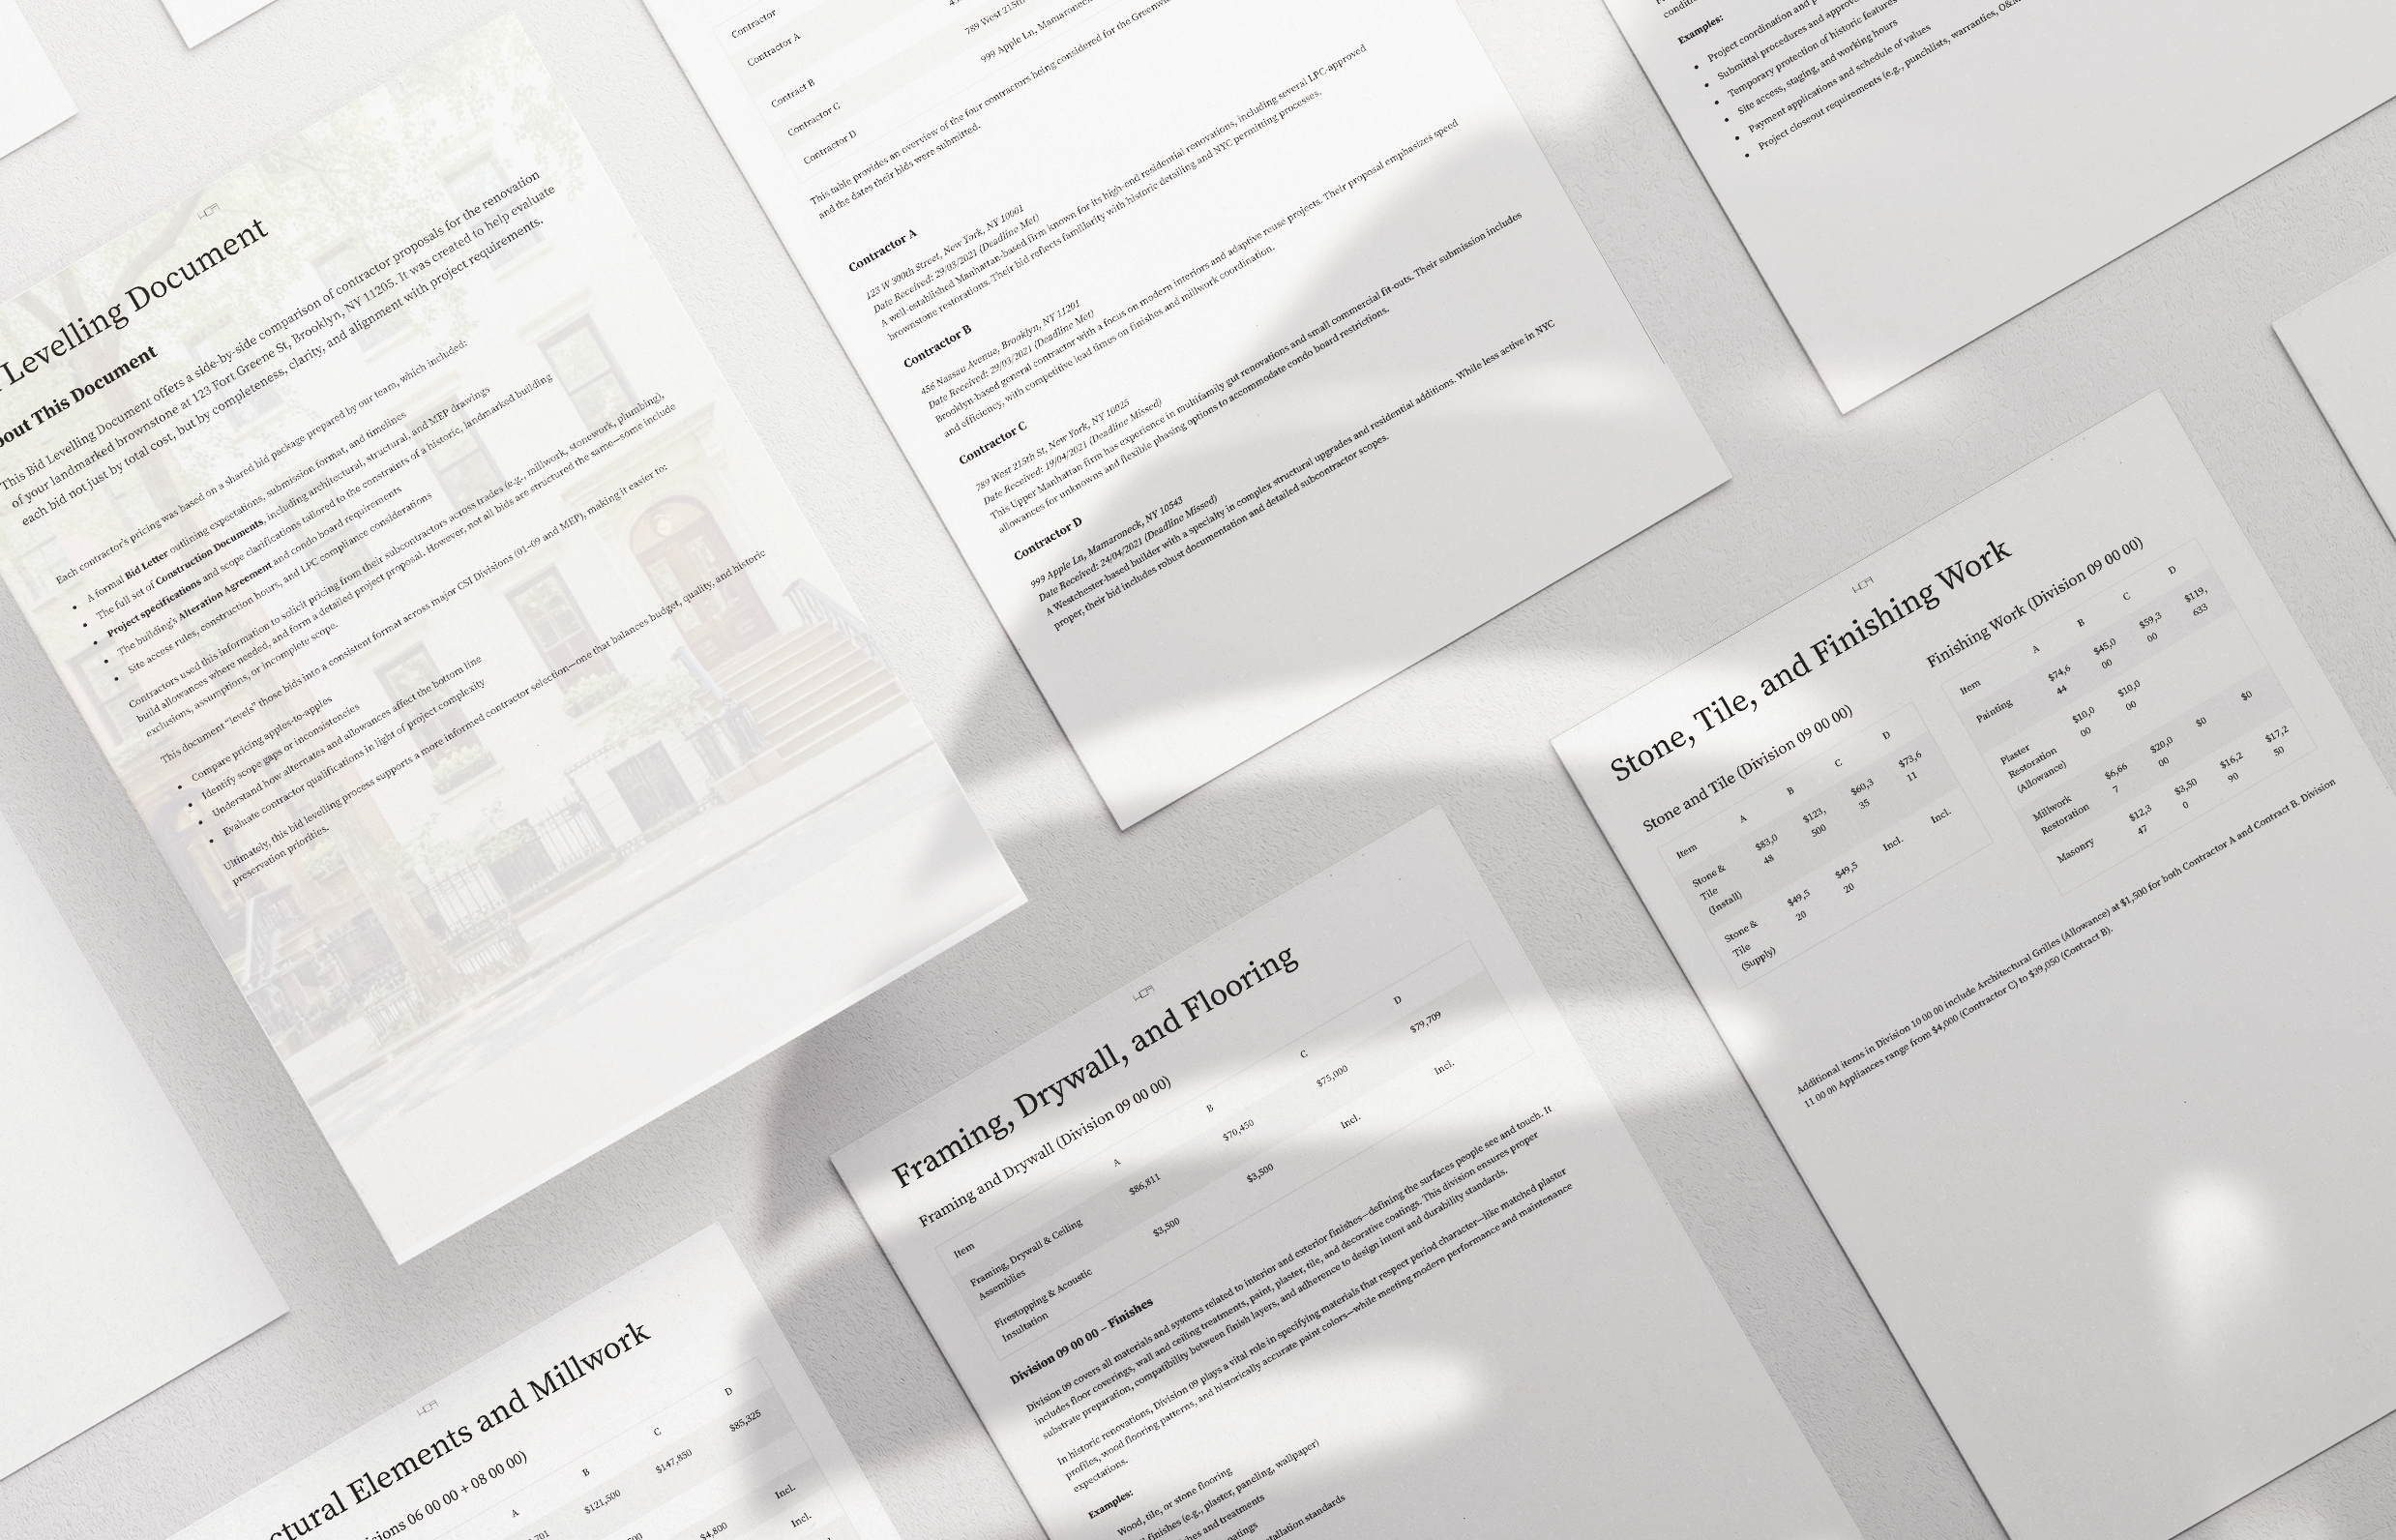
In the image above, each Construction Division is broken into separate sections to ensure a true apples-to-apples comparison. Since contractors often categorize costs differently, part of the bid levelling process involves identifying where each scope item—like “window replacement”—was placed. It could appear under Demolition, Openings, Wood, or Framing, depending on the contractor’s internal system. This step is essential for catching omissions, double-counting, or misaligned assumptions across bids.
Comparing Apples to Apples
Once bids came in (we gave them 4 weeks due to holidays in between), we embarked on a careful analysis:
We created a bid comparison spreadsheet (sometimes called a bid tab). This is where we line up each bidder’s numbers by the categories we provided, and adjust for any differences. It’s common that even with our form, contractors have slightly different assumptions or exclude certain things. So we:
Checked scope coverage: Did each bid include every single item of work? If one left out something (say, the cost for the new skylight installation), we either asked them to clarify or we noted we’ll add an allowance to that bid for comparison.
Reviewed allowances and exclusions: Bidders sometimes include allowances for unknowns (e.g., an allowance for patching “if needed” or for a finish yet to be selected). We aligned these by making them consistent. For example, if one bidder assumed $10k for high-end light fixtures and another assumed $5k, we’d adjust to a common baseline (usually per our spec or the higher quality, to be safe) when comparing totals.
Qualifications and Unit Costs: One contractor might propose a different approach – e.g., one suggested using a higher grade sound insulation than specified as an option (with a cost add). We took note of those qualitative differences. We also looked at their unit pricing (like cost per square foot for additional plaster repair, etc.) to see if any were outliers, as that can hint at who’s more costly for change orders later.
Pricing breakdown: We compared each line item to see where differences lay. If Contractor A was way higher on, say, millwork, it could mean they have a more expensive cabinet shop – or maybe they included something others didn’t, like an upgraded finish. We would then query that. We essentially tried to normalize the bids to a common scope and quality level.
After this “leveling”, we ended up with a much clearer picture. In our project, the bids came in fairly close – all within about 15% of each other, which indicated our documents were clear (when bids vary wildly, it’s often a sign of confusion or missed scope).
We then shortlisted two contractors that we felt were strongest contenders – based on price, completeness of bid, and our past experiences or references.

While AIA Document B101 is a standard agreement used widely in architectural practice, contractors often provide their own versions of construction contracts. These may differ in structure, terms, and protections. As part of the negotiation process, we review each proposed contract carefully to ensure it aligns with the project’s scope, payment milestones, change order protocols, and compliance requirements—especially for landmarked or board-regulated properties.
2. Negotiation: Clarifying the Final Contract
Shortlisting & Interviews
With a couple of preferred contractors in mind (let’s call them Contractor X and Contractor Y), we entered the negotiation stage to make a final selection and fine-tune the contract terms:
Shortlisting & Interviews: We invited our two finalists for more in-depth meetings. These were essentially interviews where we discussed:
Project Approach: We asked how they planned to tackle challenging aspects, like “How will you protect the historic stair during demo?” or “Walk us through your plan for coordinating that long lead-time kitchen equipment.” Their answers told us a lot about their mindset and preparedness. One contractor described a very clear protection plan (even specifying a product for sticky plastic on floors, and a daily cleanup routine) – that scored points.
Team & Staffing: We wanted to know who the site superintendent would be day-to-day (that’s critical – a good super keeps everything smooth). Contractor X named a super with 20 years of experience on similar jobs and even gave a resume, which gave us confidence. We also asked if they’d use their own crew vs. subs, and how many jobs they run at once (to gauge if they’d be spread thin).
Experience & References: Although we knew their portfolios, we had them share specific similar projects. One contractor had recently done a landmark townhouse – we asked how that went with Landmarks and if they encountered any issues. We also followed up on references from previous clients to ask about on-time performance and after-completion service.
These interviews, combined with the hard numbers, helped the client and us lean towards Contractor X (they were not the absolute lowest bid, but close, and we felt more trust in their quality and communication).
Final Scope & Pricing Adjustments
Before committing, we engaged in a round of value engineering and adjustments. The client had a target budget, and while all bids were within a reasonable range, we always looked for smart savings:
We reviewed Contractor X’s bid line by line with them. In this conversation, some items were refined. For example, their bid had a high cost for painting, partly because they included a speciality finisher, assuming we wanted a fancy faux finish in one room (a misinterpretation). We clarified it was standard painting, which shaved some cost.
We considered a couple of alternate materials to save money. The client was over budget on appliances (they wanted a top-of-the-line range that cost a small fortune). We suggested an alternative brand that looked similar but was cheaper, which they accepted—Contractor X re-priced that line.
We also identified a few “nice-to-haves” that could be deferred or made optional. For instance, custom panelling in the secondary bedroom was something the client could live without initially. We kept it as an add-on option to decide on later. This gave some flexibility to the budget.
Scheduling was part of negotiation too – we aligned the timeline. Contractor X said 5 months, we wanted 4; we settled on a very detailed schedule showing critical paths that aimed for about 4.5 months, with penalties if it went over without cause. They allocated extra crew to try to meet our timeline (given board constraints, finishing before the holidays was ideal).
All these adjustments got rolled into a Revised Proposal from Contractor X, which the client was happy with.
Contract Types & Key terms
We then moved to formalising with a contract. Typically, we prefer a standard form agreement (like the AIA Standard Form of Agreement between Owner and Contractor). In this case, the contractor had their own contract template, which we carefully reviewed (and had the client’s lawyer review as well). We negotiated key points such as:
Payment Schedule: We structured it with a reasonable down payment, then payments at milestones (e.g., 20% upon demo completion, 20% after rough-ins, 20% after drywall, etc.), retaining a 10% retainage until completion. This incentivises finishing the punch list. We also added a clause that any deposit the building required (like a damage deposit) would be posted by the client but underwritten by the contractor (i.e., if they damage something, they cover it).
Change Orders: We spelt out that any changes or extra costs must be documented as a written change order with pricing agreed before the work is done, except in true emergencies. This protects the client from surprise bills. We also agreed on a markup percentage for any changes (to keep it reasonable).
Schedule & Liquidated Damages: We inserted the agreed schedule into the contract and a clause for liquidated damages (a small per-day penalty for each day of delay past an agreed grace period, except delays out of the contractor’s control, like late permits or change orders). This isn’t always enforceable, but it sets the expectation that the schedule is serious.
Insurance & Permits: The contract required the contractor to carry sufficient insurance (naming the owner and architect as additionally insured) and to obtain the building permit and any specialized permits (plumbing, electrical sign-offs). Though as architects we often help with paperwork, legally, the contractor is the one who “pulls” the permit under their license.
Historic Preservation Responsibility: We even added a special clause given the nature of the project: the contractor acknowledges the historic status and agrees to perform work accordingly (no cutting corners on specified methods for restoration, etc.), and that any deviation affecting historic elements must be approved by the architect/owner. This may seem extra, but it again underscores the importance of care.
Condo Rules: The contract included an exhibit of the condo’s alteration agreement and explicitly bound the contractor to follow those rules (e.g., work hours 9-5 on weekdays, noise constraints, etc.). If the contractor violated those and got fines, it’s on them.
After a bit of back-and-forth, we reached an agreement. The client signed with Contractor X, and we were ready to move forward with them as our GC.

3. Permitting: Wrangling LPC, DOB & Condo Board
Landmarks Preservation Commission (LPC)
Early on, we had filed our application with LPC for a Certificate of No Effect (because our changes, like window replacements, did not affect the exterior appearance significantly – no major visible changes). We submitted our construction drawings related to anything LPC cares about (window details, the new roof vent, etc.) and photos of existing conditions. LPC approval came through with some minor comments (they asked that the new windows use true divided lights instead of simulated grills – which we were fine with, albeit a bit pricier, we complied). We got the LPC permit in the form of a certificate that the project had No Effect on protected features, meaning we were free to proceed. We included a note in the final drawings: “LPC Certificate No. 12345 issued [date]” as a record.
Department of Buildings (DOB)
We filed for a building permit through the DOB’s system using our signed/sealed drawings. We chose to file it as a “Professionally Certified” application – which in NYC means the architect takes responsibility that everything meets code (skipping a full DOB plan review, which speeds things up). However, the DOB still did a cursory audit review. They requested a couple of clarifications (like an asbestos abatement form and a slight correction on an energy calcuation). We addressed those immediately, and the permit was approved. Contractor X then pulled the permit under their license, meaning they registered as the contractor for the job and posted a bond, etc. We also had to file separate permits for electrical and plumbing work – those were done by the licensed Electrician and Plumber that Contractor X hired, with our drawings as reference. We got those permits too.
One wrinkle: because the building is over a certain height, adding sprinklers triggered a FDNY (Fire Dept) sign-off as well. We coordinated an inspection for after installation but had to note it on permit. Also, the building being a multi-unit, we had to notify the Department of Environmental Protection about our planned asbestos removal (even though we already abated pre-construction, standard procedure).
Condo Board & Alteration Agreement
The condo board needed to give final written approval for work to start. We had to submit:
The contractor’s insurance certificates (with correct liability coverage naming the condo as insured). This took a bit of back-and-forth because the board wanted specific language on the certificate, but Contractor X’s insurance agent handled it.
A security deposit (from the client) that the building holds in case of damage to common areas. Also a check for a refundable elevator padding fee and a non-refundable administrative fee. These were as per the alteration agreement.
The final construction schedule and working hours, along with contact info for the site supervisor. They wanted a promise that work would stick to allowed hours. Contractor X wrote a nice site logistics plan including using the service entrance, daily debris removal routine, etc. which we forwarded.
A signed form by Contractor X acknowledging they read and will follow the building rules (e.g., no loud work after 4 pm, no work on weekends, must cover lobby floors during material transport, etc.).
The condo board’s architect reviewed our final plans (no issues, since he had seen them evolve) and we had a quick meeting with the building manager to walk them through how deliveries would be handled (we agreed to schedule any large deliveries 48 hours in advance with management to reserve elevator pads).
After satisfying all these items, the condo board gave the green light. They set a start date (we had to wait until one week after another unit’s project finished to avoid two simultaneous jobs – a condo preference to minimize overall building disruption).
Pre-Construction Meeting
Just before starting, we held a pre-construction meeting with everyone: client, architect (us), contractor, site super, building manager, and even invited the neighbors on each side for a quick hello (a nice touch to keep relations good). We went over the schedule, site access, and communication protocol. Everyone was literally and figuratively “on the same page” from day one.
At this point, we had:
• A trusted contractor under contract.
• All permits in hand (DOB, LPC, etc.).
• Condo board approval and all neighbor notifications done.
• A clear plan and schedule for construction.
In other words, shovels (or hammers) were ready to hit the ground. The project was primed to move into the Construction phase, with all groundwork laid to hopefully execute without major hiccups.
Pre-Construction Phase Checklist
-
Construction documents, specs, scope summary, bid forms.
-
One important aspect of the bidding process when you have multiple bidders is to provide consistent information and ensure it is available to all bidders. In addition to the bid documents previously sent this means responding to RFIs (Requests for Information), The responses to the questions are compiled and sent to all of the bidders.
-
This is a tedious process that involves lots of back and forth with bidding contractors to finalize scope, price, payment schedule, and contract type.
-
Finalize scope, price, payment schedule, and contract type.
-
Submit final design if you’re in a historic district or landmarked building.
-
Architectural, Mechanical, Plumbing, Structural (as needed)
Asbestos doumentation & energy compliance
-
Meet all alteration agreement requirements, deposits, insurance requirements and other building rules. Don’t forget to have the buildings’ progress allocated for in the construction schedule.
-
Anticipate board/dob review times, re-submissions if necessary.
Link to a downloadable Bidding & Permitting Checklist.
Next Step: Construction Administration
With a signed contract in hand and permits (hopefully) on the way, it’s time to break ground. The next phase—Construction Administration—is where design meets reality. We’ll oversee demolition, track change orders, and ensure everything aligns with the final Construction Documents—all while addressing any surprises that a 19th-century building might still have in store.